 默认路由和浮动路由实验
# 默认路由
提示
路由中的默认路由和PC中的默认网关是一回事。
默认路由(Default Route) 是为了弥补静态路由无法覆盖所有网络的不足而产生的。路由器在转发数据包时,会匹配路由来进行转发,但是通过静态路由配置的路由数量有限,很有可能出现匹配不到合适的路由的情况,这时数据包就会被丢弃。 通过配置默认路由,当数据包无法匹配合适的路由时,就会从默认路由转发给下一跳路由,由下一跳路由来处理。
默认路由的配置命令:
Router(config)# ip route add 0.0.0.0 0.0.0.0 10.1.1.1
1
# 实验目标
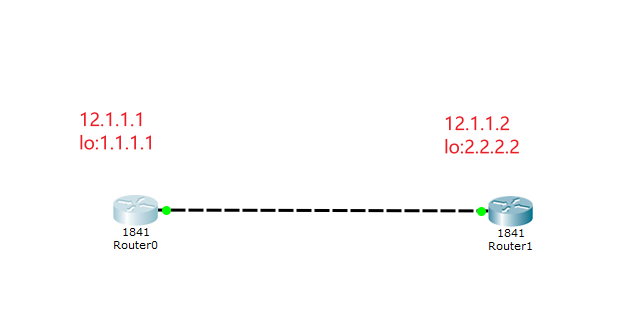
# 实现过程
R1:
Router>enable
Router#configure terminal
Enter configuration commands, one per line.  End with CNTL/Z.
Router(config)#interface f0/0
Router(config-if)#ip add 12.1.1.1 255.255.255.0
Router(config-if)#no shutdown
%LINK-5-CHANGED: Interface FastEthernet0/0, changed state to up
Router(config)#interface loopback 1
Router(config-if)#ip add 1.1.1.1 255.255.255.255
Router(config)#ip route 0.0.0.0 0.0.0.0 12.1.1.2
1
2
3
4
5
6
7
8
9
10
2
3
4
5
6
7
8
9
10
R2:
Router>enable
Router#configure terminal
Enter configuration commands, one per line.  End with CNTL/Z.
Router(config)#interface f0/0
Router(config-if)#ip add 12.1.1.2 255.255.255.0
Router(config-if)#no shutdown
Router(config-if)#exit

Router(config)#interface loopback 1
Router(config-if)#ip add 2.2.2.2 255.255.255.255
Router(config-if)#no shutdown
1
2
3
4
5
6
7
8
9
10
11
2
3
4
5
6
7
8
9
10
11
# 结果验证
#登录R1, ping 2.2.2.2 来验证默认路由是否配置成功。
Router>ping 2.2.2.2

Type escape sequence to abort.
Sending 5, 100-byte ICMP Echos to 2.2.2.2, timeout is 2 seconds:
!!!!!
Success rate is 100 percent (5/5), round-trip min/avg/max = 0/0/0 ms
1
2
3
4
5
6
7
2
3
4
5
6
7
# 环路现象
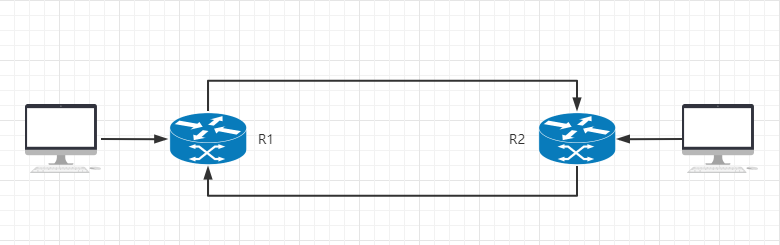
当 R1 的默认路由配置成了 R2 的地址, R2 的默认路由配置成了 R1 的地址。数据包就可能(当无法匹配静态路由时)会在 R1 和 R2循环转发,这就是默认路由会造成的问题: 环路问题。
# 浮动路由
浮动路由(Floating Route) 用于实现多出口环境下的路由选择优先级。通过设置路由的管理距离决定路由的优先级。一般管理距离在 0-255 之间,值越小代表优先级越高。
通过在路由配置后追加管理距离参数来配置:
Router(config)#ip route 0.0.0.0 0.0.0.0 172.16.10.1 100
Router(config)#ip route 0.0.0.0 0.0.0.0 172.16.10.2 10
1
2
2
# 实验目标
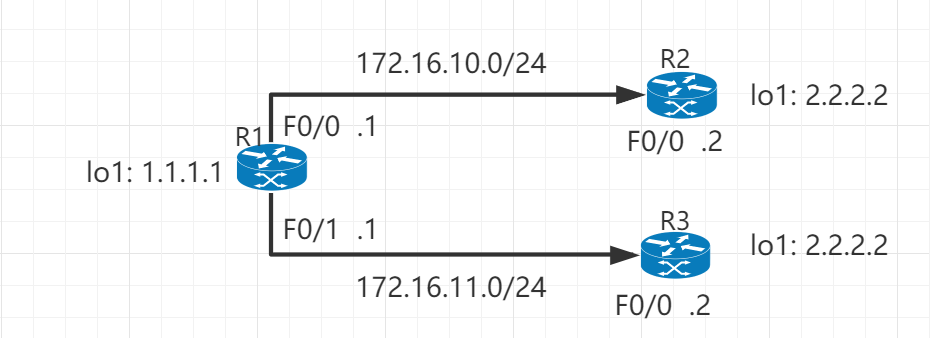
# 实现过程
R1的配置:
Router>enable
Router#configure terminal
Router(config)#interface f0/0
Router(config-if)#ip add 172.16.10.1 255.255.255.0
Router(config-if)#no shutdown
Router(config-if)#exit

Router(config)#interface f0/1
Router(config-if)#ip add 172.16.11.1 255.255.255.0
Router(config-if)#no shutdown
Router(config-if)#exit

Router(config)#interface loopback 1
Router(config-if)#ip add 1.1.1.1 255.255.255.255
Router(config-if)#exit
1
2
3
4
5
6
7
8
9
10
11
12
13
14
15
2
3
4
5
6
7
8
9
10
11
12
13
14
15
R2的配置:
Router>enable
Router#configure terminal
Router(config)#interface f0/0
Router(config-if)#ip add 172.16.10.2 255.255.255.0
Router(config-if)#no shutdown
Router(config-if)#exit

Router(config)#interface loopback 1
Router(config-if)#ip add 2.2.2.2 255.255.255.255
Router(config-if)#exit
1
2
3
4
5
6
7
8
9
10
2
3
4
5
6
7
8
9
10
R3的配置:
Router>enable
Router#configure terminal
Router(config)#interface f0/0
Router(config-if)#ip add 172.16.11.2 255.255.255.0
Router(config-if)#no shutdown
Router(config-if)#exit

Router(config)#interface loopback 1
Router(config-if)#ip add 2.2.2.2 255.255.255.255
Router(config-if)#exit
1
2
3
4
5
6
7
8
9
10
2
3
4
5
6
7
8
9
10
R1的浮动路由配置:
Router(config)#ip route 0.0.0.0 0.0.0.0 172.16.10.2 1
Router(config)#ip route 0.0.0.0 0.0.0.0 172.16.11.2 100
1
2
2
# 结果验证
首先开启 R2, R3 的DEBUG模式:
Router#debug ip icmp
ICMP packet debugging is on
1
2
2
在 R1 路由上执行 ping 2.2.2.2, 可以在 R2 控制台观察到数据包:
Router#debug ip icmp
ICMP packet debugging is on
Router#
ICMP: echo reply sent, src 2.2.2.2, dst 172.16.10.1
ICMP: echo reply sent, src 2.2.2.2, dst 172.16.10.1
ICMP: echo reply sent, src 2.2.2.2, dst 172.16.10.1
ICMP: echo reply sent, src 2.2.2.2, dst 172.16.10.1
1
2
3
4
5
6
7
2
3
4
5
6
7
接下来在 R2 上关闭 F0/0 端口:
Router(config)#interface f0/0
Router(config-if)#shutdown
1
2
2
再次在 R1 路由器上执行 ping 2.2.2.2, 此时数据包就会发送到 R3 路由器上:
Router#
ICMP: echo reply sent, src 2.2.2.2, dst 172.16.11.1
ICMP: echo reply sent, src 2.2.2.2, dst 172.16.11.1
ICMP: echo reply sent, src 2.2.2.2, dst 172.16.11.1
ICMP: echo reply sent, src 2.2.2.2, dst 172.16.11.1
1
2
3
4
5
2
3
4
5
上次更新: 2022/12/30, 16:48:05